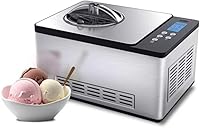
How to Use a Whynter Ice Cream Maker
To use a Whynter ice cream maker, mix and chill the base, pour it into the removable bowl up to the fill line, start the churn and compressor together, and let the built-in timer run until the mix thickens. Scoop it soft-serve style right away or firm it in the freezer for an hour.
On this page (10 sections)
- What do you need before you start a batch?
- How do you set up a self-freezing Whynter?
- How do you mix and chill the base?
- How do you start the churn and the compressor?
- How long should you let it churn?
- How do you serve and store the finished ice cream?
- How do you clean and care for the machine?
- Which Whynter should you pick for your kitchen?
- What mistakes make a batch fail?
- What's the simple routine to remember?
Here's how to use a Whynter ice cream maker: mix and chill the base, pour it into the removable bowl up to the fill line, run the churn and compressor together, and let the timer tell you when the mix thickens. Serve it soft right away or firm it in the freezer.
The steps below cover the self-freezing Whynter models, which churn and freeze in one unit. Learning how to use the Whynter ice cream maker well comes down to temperature, batch size and a little patience.
What do you need before you start a batch?
Gather a mixed and chilled base, a spatula, a container for the finished ice cream, and a cold spot in the freezer for firming. A kitchen scale helps you follow a recipe's sugar and fat amounts closely.
You also need the machine's parts in place: the removable bowl seated fully, the churn blade on its shaft, and the lid locked down. A base that sits in the fridge for a few hours goes in colder and freezes faster.
Have a shallow container ready so you can move the soft ice cream out quickly. Warm weather in the kitchen slows freezing, so a cooler room helps.
How do you set up a self-freezing Whynter?
Set the machine on a flat, dry counter near an outlet, fit the bowl and blade, then close the lid. A self-freezing model has no bowl to pre-chill, so setup is quick.
Whynter's compressor models chill the mix as the blade turns. That's the main difference from a freezer-bowl maker, where the bowl waits overnight in the freezer before you start.
Wipe the inside of the bowl dry before you add anything. Check that the blade turns freely by hand and that the bowl sits flush in its slot.
Then plug the machine in. The removable bowl on the Whynter models lifts out and drops back in without tools, so fitting it takes a moment.
Which Whynter model fits your counter?
Counter space decides this for most people. The upright ICM-201SB stands tall at about 14.25 inches square and holds 2.1 quarts.
The ICM-200LS is a wider, lower build at about 16.75 by 11.25 inches.
The ICM-128WS is the smaller upright, holding 1.28 quarts. Pick it when you make smaller batches and want the smallest footprint.
Pick a 2.1-quart model when you feed a family or want leftovers. The two 2.1-quart machines weigh in at 24.3 pounds, while the compact upright is lighter at 19.3 pounds.
How do you mix and chill the base?
Whisk the base until the sugar dissolves, then chill it in the fridge until it's cold to the touch. A cold base goes into the bowl ready to freeze.
Cooked bases with eggs need to cool first. An ice bath speeds that up, and the fridge finishes the job.
A warm base can overwhelm the compressor and leave you with soup.
Keep to the recipe's fat and sugar. Too much water makes icy crystals; too much alcohol or salt keeps the mix from setting.
Aim for a smooth, pourable custard before it goes in.
Can you use any ice cream recipe?
Any churned-frozen recipe works, from custard to sorbet. Fruit purees and dairy bases behave best, while very high-alcohol mixes need extra time or a lower spirit amount.
Gelato and sorbet bases suit the same machines. A base with plenty of fat freezes softer and scoops sooner, while a lean sorbet needs the full run time to set.
How do you start the churn and the compressor?
Turn on the churn first, then start the compressor so the blade is moving before the bowl gets cold. Pour the chilled base through the lid opening while the machine runs.
Fill only to the bowl's fill line. A mix that starts too high can climb the walls as it whips and air gets folded in.
Leave headroom for that expansion. The removable mixing bowl is BPA-free aluminum, so it chills quickly once the compressor starts.
Set the timer for the recipe's suggested time. The LCD panel shows the run time, and the audible timer signals when the batch is done.
Stay nearby for the first few minutes to check the blade is turning cleanly.
How long should you let it churn?
Plan on about 30 to 60 minutes, depending on the base and the room. A rich custard sets in around 30 to 45 minutes, while a watery sorbet can take longer.
Listen to the machine rather than trusting only the clock. When the paddle starts to drag and the mix pulls away from the bowl in soft peaks, it's close.
That soft-serve texture is the sign to stop.
Letting it run far past that point strains the motor. Whynter builds in motor protection for exactly this case.
If the drive slows or stalls, stop the batch and firm it in the freezer. A second batch can follow right away, since the compressor keeps chilling without a freezer break.
How do you serve and store the finished ice cream?
Scoop the soft ice cream into a chilled container and firm it in the freezer for about an hour for a scoopable texture. Serve straight from the machine if you like soft-serve.
Press plastic wrap onto the surface before you lid the container. That keeps ice crystals from forming on top.
Homemade ice cream is best eaten fresh.
Let a hard-frozen batch sit on the counter for a few minutes before scooping. A quick rest softens the edges without melting the middle.
On the upright models, the stainless bowl lifts out so you can carry it to the table instead of scooping at the counter.
How do you clean and care for the machine?
Unplug it, lift out the bowl and blade, and hand wash both in warm soapy water. Wipe the base and housing with a damp cloth, and never dunk the motor base.
Whynter says the bowl and the BPA-free churn blade are hand wash only.
Dry every part fully before it goes back in. A wet bowl left in place can grow odors and start the next batch cold in the wrong way.
Reassemble only when everything is dry.
Check the bowl and blade for cracks or chips now and then. Store the machine with the lid off so air can circulate.
If a batch won't freeze or the blade won't turn, work through our Whynter ice cream maker troubleshooting steps before assuming the machine has failed.
Which Whynter should you pick for your kitchen?
Pick the model by batch size and counter space, then follow the same steps on any of them. The three current models share the compressor design, so the process above works on all of them.
The ICM-201SB upright gives the most capacity in a narrow footprint, and its removable stainless bowl lifts out for serving and washing. The ICM-200LS spreads wider but sits lower, which suits a counter under a cabinet.
The smaller ICM-128WS fits tight kitchens and smaller households.
The ICM-201SB also carries a one year limited manufacturer warranty, and both upright models have the same motor protection and built-in timer as the wider ICM-200LS.
Read more detail in our Whynter ICM-201SB review if the upright 2.1-quart model is the one you're considering. If you're still weighing a freezer-bowl maker against a self-freezing one, our guide to the best ice cream makers for home use covers the trade-offs.
What mistakes make a batch fail?
Warm base, overfilling and running past the set point cause most failed batches. Fix those three and most problems disappear.
- A base straight from the stove won't freeze well. Chill it first.
- Pouring past the fill line makes the mix climb and spill.
- Stopping too early leaves soup; running far too long strains the motor.
- Skipping the bowl's fill-line mark and guessing at capacity wastes a batch.
If you want the basics for any machine, our how to use a ice cream maker walkthrough covers freezer-bowl models too. The self-freezing Whynter just skips the overnight bowl step and adds a timer.
What's the simple routine to remember?
Use the same short routine for how to use a Whynter ice cream maker every time: mix, chill, pour, churn, stop at soft peaks, then firm in the freezer. Keep to the fill line, watch the timer and listen for the paddle to slow.
Pick a 2.1-quart upright for family batches, a wide low model for under-cabinet counters, or the compact upright for small kitchens. Clean the bowl by hand and dry it fully, and your next batch starts clean.
Start with a simple vanilla custard base and adjust from there. Once you know how your machine handles one base, the next recipe is easy to tune.
Frequently asked questions
How long does a Whynter ice cream maker take to finish a batch?
Most batches take about 30 to 60 minutes in a self-freezing Whynter. Run time depends on the base's fat and sugar, how cold it went in, and the room temperature.
Watch for a thick, soft-serve texture and stop when the paddle slows against the mix.
Does the bowl need to go in the freezer first?
No. A Whynter with a built-in compressor chills the mix as it churns, so there is no overnight pre-freezing step.
Let the compressor do the cooling, which is what makes back-to-back batches possible.
Can I make more than one batch in a row?
Yes. A self-contained compressor keeps chilling the mix, so a second batch can follow the first the same afternoon.
Empty and quickly rinse the bowl between batches, then start the next mix once the bowl is back in place.
Why did my ice cream stay soft?
The base probably went in too warm, had too much water or alcohol, or the bowl was overfilled past its fill line. Chill the mix in the fridge first, keep to the fill mark, and let the timer run longer before you scoop.
How do I clean a Whynter ice cream maker?
Lift out the removable bowl and churn blade and hand wash both in warm soapy water. Wipe the motor base and housing with a damp cloth and never dunk the base.
Dry every part fully before it goes back in the machine.